How to Change or Add a Custom Favicon Onto Your Blog on Blogger
Favicon is indeed a tiny 16px X 16px size picture/icon which you can find next to any websites URL in browser address bar. Usually, it's a websites logo. You can add your own fancy favicon to get visitors attention. If you want to upload/add your own custom favicon, whether it's static or animated picture, it should be of square size and less than 100KB. It can be of .png or .gif or .jpg or .ico format. If you don't have such square and less than 100KB icon, you can search web, where you can find different websites offering free services to create favicon for your blog/website. Creating and adding of favicon is very easy and can be done in few minutes
Step 1 :- Go to www.favicongenerator.org and upload your favorite image of which you want to create a favicon. ( Image size should be more than or equal to 16px X 16px )

Step 2 :- Write your blog title as scrolling text and press Generate Favicon button
To Add a Static Favicon Follow These Steps :-
Step 1 :- Go to www.favicongenerator.org and upload your favorite image of which you want to create a favicon. ( Image size should be more than or equal to 16px X 16px )

Step 2 :- Write your blog title as scrolling text and press Generate Favicon button
Step 3 :- Right Click on favicon.ico Image and select Save Image As to save icon on your computer.
Step 4 :- Log In to your blogger account > Go to Layout > Click Edit Favicon.
Step 5 :- Browse and upload your icon, done, you have added your own custom favicon successfully.
Step 3 :- Right Click on animated favicon.gif Image and select Save Image As to save animated icon on your computer.
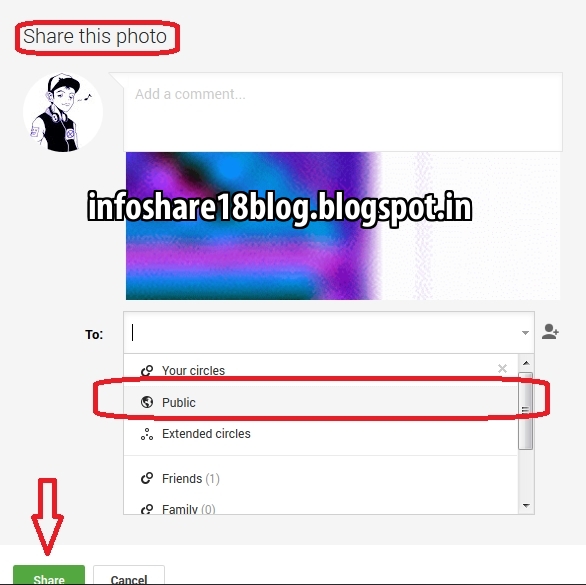 Step 4 :- Go to your Google+ account and upload that
 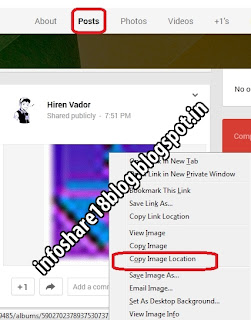 animated icon and share it publicly.
Step 5 :- Check " Posts" shared by you and select post in which you have shared your animated icon.
Step 6 :- Right click on that animated icon and select " Copy Image Location " and paste it in other Tab/Window.
Step 7 :- Go to Template > Edit HTML.
Step 8 :- Find " <b:skin> ".
Just above it paste these code -
<link href= ' YOUR LINK ' rel= ' icon ' type='image/gif '/>

Step 9 :- Replace YOUR LINK with the link which you had opened/pasted in other tab. Save your template and job is done. Now view your blog to see new animated favicon in action.
If you still don't see your new favicon, clear browser's cache and again view your blog, you can see now.
To Add a Animated Favicon Follow These Steps :-
Step 1 and Step 2 are same as aboveStep 3 :- Right Click on animated favicon.gif Image and select Save Image As to save animated icon on your computer.
 Step 4 :- Go to your Google+ account and upload that
  animated icon and share it publicly.
Step 5 :- Check " Posts" shared by you and select post in which you have shared your animated icon.
Step 6 :- Right click on that animated icon and select " Copy Image Location " and paste it in other Tab/Window.
Step 7 :- Go to Template > Edit HTML.
Step 8 :- Find " <b:skin> ".
Just above it paste these code -
<link href= ' YOUR LINK ' rel= ' icon ' type='image/gif '/>

Step 9 :- Replace YOUR LINK with the link which you had opened/pasted in other tab. Save your template and job is done. Now view your blog to see new animated favicon in action.
If you still don't see your new favicon, clear browser's cache and again view your blog, you can see now.
How to Find if a Torrent File is Real or Fake Without Downloading
People who are new to torrents usually download torrent file just by reading it's file name and they are in so much hurry that they don't try to find whether torrent file which they are going download is real enough or fake, and end up downloading a fake one. There are many swindlers and dishonest P2P individuals who use fake torrents to damage their computers with viruses, Trojan, phish peoples identification, cheat them for money. Identifying a fake torrent is so easy that you don't even need to download and waste time. Many websites like isohunt, mininova, thepiratebay and so have build up their own community to examine and find fake torrents. Before you download any torrent file make sure you follow below mentioned suggestions :-


Using above mentioned suggestions, one can easily spot fake torrent without downloading it. Have any suggestions/feedback please feel free to share.
Size of Files
When you search a torrent, say a particular movie torrent, check the size of files it contains. View 3-4 similar torrents and compare them, if it's a genuine torrent the size of files in it will be almost same. If you find huge different in size of files, look for another torrent.Date of Files
Check the official release date of file which you are looking for. If file has not released officially, how can you find it's torrent file?. Even though you come across such torrent, just ignore it because it's a fake one and wait till it get's officially released.Number of Seeds and Leechers
If torrent file has large number of seeds it means many people have that file and are hosting it and large number of leechers means large number of people are downloading that file. In short, if torrent file is fake, you'll find zero or one number of seeds/leechers. If torrent file is genuine, large number of people would be hosting and downloading it, so more number of seeds/leechers indicates file is real and not fake.Take a Look at Comment/Feedback Section
Every torrent file has some reviews, maybe good or bad. If torrent file is genuine, large number of people would be downloading it and few of amongst them would definitely write their feedback. Through comment section, one can easily judge whether file would be fake or real. If torrent is fake, you'll find negative or no feedback. If you came across any torrent file, whether fake or real, do drop a comment because it will help others like you to judge that torrent file.Torrent Uploaded From Trusted Uploader
Whenever any genuine uploader uploads a torrent file, he/she would always write it's identity name at the end of file name so that people would recognize and download it's file whenever they come across, without any fear. For example if I want to download a movie torrent, I would search torrent file uploaded by uploader who's identity I know because I know he/she never uploads a fake torrent.
Password Protected File
Files downloaded through torrent are never password protected. If you come across a torrent which contains a " Password File ", never download it. Possibly, it would ask you to complete a task/survey to get password or download some toolbar/extra file or share your personal information or it may even contain a virus which can harm your computer system. Torrent files are always password-free.Download Verified Virus Free Torrents
Websites like Isohunt, Torlock and so provide virus free torrents. If a torrent is verified and virus free, you'll find " Verified Torrent " mentioned somewhere near torrent file, and if you don't it means torrent is not yet verified, look for other torrent.
Using above mentioned suggestions, one can easily spot fake torrent without downloading it. Have any suggestions/feedback please feel free to share.
How To Change/Adjust size of Images on Blogger Other Than Small, Medium, Large, X-large (With Images)
Whenever you upload a image on blogger, by default, the size of image is medium which has 240pixels height and 320pixels width. To change the size of picture, you need to click on it and options available to you are small, medium, large, x-large, original size, this are the default options available to every user. If want the size of image to be between medium and large or between large and x-large or of any size, you need to edit the HTML code of that particular image which is very easy to do. But finding HTML code of that particular image can be frustrating and confusing if your post consist of too many text, images already. However, confusion can be avoided by simply pressing " ENTER " button 4 to 5 times after image, that is, gap/space between " Image " and "Text after that image " should be of 4 to 5 lines (see picture), you'll understand why we did this as you read more.
Follow this simple and quick steps one by one and at the end you'll have image of desired size :-
Step 1 :- Upload/place the picture wherever and whichever you want, the size of image would be medium by default. (In Compose mode)
Step 2 :- After placing/uploading image, just after image, click and press " ENTER " button 4-5 times such that there is some gap between " Image " and " Text after that image ". This step is important if you are uploading pictures after writing/completing your entire text work of that post/blog. Due to gap in-between, it becomes easy to locate HTML code of that particular image when you switch to HTML MODE to edit it's HTML code. Otherwise, finding it's HTML code will consume lot of time.

Step 3 :- Click on image and select Small or Medium or Large or X-Large size, any of them, but do not select " Orignal size ".
Step 4 :- Switch to HTML MODE by clicking on HTML.
Step 5 :- Scroll down and as you scroll, at some instant, you'll see this
<br />
<br />
<br />
<br />
<br />
(you'll find "<br /> " 5 times if you had pressed ENTER button 5 times after that image which you want to edit, if pressed 4 times, you'll see " <br /> " 4 times and so on)

Step 6 :- Just above that first " <br / > ", there will be some 3-4 lines code starting from
<a href = " http://.................................................................................and ending with ....................................................</a> </div>. Copy that code and paste it in " Notepad "(To open Notepad, press " Windows + R " and type " Notepad " and press ENTER button).
Step 7 :- Switch back to COMPOSE MODE.
Step 8 :- Click on image and select " Original Size ".
Step 9 :- Switch to HTML MODE.
Step 10 :- Again find those
<br />
<br />
<br />
<br />
<br />

Compare the 3-4 lines code above first " < br /> "starting from " <a href= " http://..............." with the code which you had copied into Notepad. You'll find " height and width " missing, everything else will be same. You can write missing code manually or copy that height and width from Notepad and paste it.
Step 11 :- Change dimensions of height and width as you want
For example :-
height = " 700 " and width = " 400 "
height = " 600 " and width = " 300 " and so on.
Keep on changing dimensions till you find image of desired size. As you change dimensions, side by side keep on checking how does that image appears on your blog/post in PREVIEW Mode in other tab.
Step 12 :- When you get satisfied with image size, switch to COMPOSE MODE and delete that gap/space which you had created between " Image " and " Text after that image ". Job is done, now delete/close that Notepad file.
For every image, you need to follow these steps. If you had changed dimensions of height and width in HTML Code mentioned in " Step :- 6 ", you would have got a stretched picture which would not be clear enough. Whereas, when you change dimensions of height and width in HTML Code mentioned in " Step :- 11 ", you get a shrank and clear picture. Shrank pictures are more clear compared to stretched pictures [See Picture For Proof]. You can try editing height and width in both step-6 and step-11, you'll see the difference. Repeat these steps for adjusting any image to desired size
 .
.
height = " 600 " and width = " 300 " and so on.
Keep on changing dimensions till you find image of desired size. As you change dimensions, side by side keep on checking how does that image appears on your blog/post in PREVIEW Mode in other tab.
Step 12 :- When you get satisfied with image size, switch to COMPOSE MODE and delete that gap/space which you had created between " Image " and " Text after that image ". Job is done, now delete/close that Notepad file.
For every image, you need to follow these steps. If you had changed dimensions of height and width in HTML Code mentioned in " Step :- 6 ", you would have got a stretched picture which would not be clear enough. Whereas, when you change dimensions of height and width in HTML Code mentioned in " Step :- 11 ", you get a shrank and clear picture. Shrank pictures are more clear compared to stretched pictures [See Picture For Proof]. You can try editing height and width in both step-6 and step-11, you'll see the difference. Repeat these steps for adjusting any image to desired size
Check out other interesting blogs -
How to Merge/Combine Multiple .vcf/.csv Contact Files Into One Single .vcf/.csv File Manually Using Command Prompt
.vcf convertor
,
.vcf to .csv
,
Combine .vcf file
,
Computer Tips
,
Contact files
,
Internet Tips
,
Laptop Tips
,
merge all contacts
No comments
Telephone directory or Contacts are most important thing for everyone in this world and no one would like to loose information like phone numbers, addresses etc of loved ones, so for safety, we usually keep a backup of our all contacts, if we loose or damage our gizmo we can import contacts using that backup. Generally if we want to import or transfer contacts from one gizmo to another or to create a backup of contacts, we use " VCARD " feature. In this feature, each contact is saved in a separate vCards(.vcf file) format. If you have too contact files (.vcf files) and you want to transfer them into some gizmo or any online account it becomes a hectic task. At this moment, converting or combining them into one single contact (.vcf) file is useful and handy, so instead of carrying thousands of contact files its better to carry one single file wherever you need. Merging of contact files can done easily and manually and within few minutes using COMMAND prompt.
Step 1 :- Copy all your thousands of contact (.vcf) files into any one particular folder or directory.
 Step 2 :- After copying all contact into single folder, now , press shortcut key " Windows + R " or go to option and open windows command prompt.
Step 3 :- Type " CMD " in windows command prompt, as you enter these, command prompt will open.
Step 4 :- As command prompt opens, now navigate to the folder/directory where you have stored all your contact files.
Ex :- Type the drive name and then folder
D: [Press Enter]
Cd allcontacts [Press Enter]
Step 5 :- After navigating to that folder/directory, enter following DOS command:
" copy *.vcf all.vcf " - For copying .vcf files.
" copy *.csv all.csv " - For copying .csv files.

Step 6 :- Wait for a moment as all your contacts get merged, it will take few seconds.
Step 7 :- Now go to that folder/directory where you had copied all your contacts. You'll find one merged "all.vcf " file of few KB's, just import that single .vcf file wherever you need like on google account, smart phone.
Your .vcf file gets converted into .csv file, you can edit or view in MS Excel or use " CSVed " software which is free to download ( Link to download - csved.sjfrancke.nl ). Follow these steps to merge multiple Vcard files into single Vcard file :-
Step 1 :- Copy all your thousands of contact (.vcf) files into any one particular folder or directory.

Step 4 :- As command prompt opens, now navigate to the folder/directory where you have stored all your contact files.
Ex :- Type the drive name and then folder
D: [Press Enter]
Step 5 :- After navigating to that folder/directory, enter following DOS command:
" copy *.vcf all.vcf " - For copying .vcf files.
" copy *.csv all.csv " - For copying .csv files.
Step 6 :- Wait for a moment as all your contacts get merged, it will take few seconds.
Step 7 :- Now go to that folder/directory where you had copied all your contacts. You'll find one merged "all.vcf " file of few KB's, just import that single .vcf file wherever you need like on google account, smart phone.
Convert .VCF to .CSV
For converting a single or merged .vcf file to .csv file, follow this easy steps:
- Open any web browser and go to link " labs.brotherli.ch ".
- Click on " VCF-Convert ".
- Click on " Browse " button. ( A file navigation box will open, navigate to and click on .vcf file which you wanted to convert to .csv file and click on " Open" button)
- Click on " Format " drop-down box and select " CSV" file format as output.
- Click on " Convert " button.
How to Check If a Website is Fake or Not?
Fake
,
Genuine
,
How to
,
Internet Tips
,
Real
,
Website
No comments
Many people want to earn some money by working at home online on the internet. The internet is full of opportunities to make some passive income but there are risk of various scams too. Some people don't read the terms and conditions fully and just by seeing their huge banners, images of cheque and by reading 2-3 lines on website join them hoping that they will earn. Actually nowadays there are many such websites who just attract people by showing them huge banners, few images of payed cheque and don't show the actual work which has to be done to earn money from their site or to start your earnings. There are only few websites who really gives money and openly shows conditions and the kind of work which has to be done to earn such as Google Adsense which shows proofs of their payments.
So before signing up at any website do check whether that website is indeed legitimate. Here are ways to check them :-
So before signing up at any website do check whether that website is indeed legitimate. Here are ways to check them :-
SEARCH GOOGLE
Whenever you join or sign up for any website, first thing you should do is to check reviews of that website. Searching on Google is the best option, if that website is been existing from many years than you will definitely get reviews regarding that website, even if that website is new you'll get some information.
CONTACT PAGE
Every website has a contact page where its phone number, Email ID, company address would be there. If it's a fake website then they wont have a contact page or even if they have, they wont put real phone number, address. This really helps to verify whether website is genuine or fake.
ALEXA RANK
Check the Alexa rank of that website. It is a web information website which provides the information of any website, it provides the information about the popularity of that website in terms of traffic. If that website is genuine than definitely it would be having a huge amount of traffic. This Alexa provides details of any website on the basis of web browsing activities done by people who have installed the Alexa toolbar in their computer or web browser. By viewing the traffic stats of that website one can easily judge whether that website is fake or not.
HTTPS
Every genuine and authentic website has its URL starting from HTTPS and a website receives a HTTPS after putting a digital certificate on its server, and in order to get that digital certificate, the owner of that website will have to authenticate himself by providing his personal information to the SSL authority. If that website is fake than the owner of that website wont get any digital certificate from an authorized SSL registrar.
FORUMS
This is an another way to verify about website. There are number of valuable forums running on the internet, one can ask question about any website in any forum and if anyone is interested in answering them then you will easily be able to judge whether the website is fake or not.
WEBSITE FANS
If that website is genuine than definitely if would have its own page or account on Facebook, Twitter or some where else where their fans must be following them and also through this they try to increase their traffic.If you have any suggestions or would like to share something then feel free to share.
Subscribe to:
Comments
(
Atom
)


No comments :
Post a Comment